
Shipping Container Home Insulation: The Complete Guide to Staying Comfortable Year-Round
If you're building or planning a shipping container home, insulation might be the single most important decision you'll make, and one of the most commonly underestimated. Get it right, and your container home stays comfortable in summer and winter, your energy bills stay manageable, and you avoid the hidden enemy of any metal building: condensation. Get it wrong, and you'll be fighting moisture damage, sky-high heating costs, and rooms that swing between sauna and freezer. This guide covers everything you need to know about shipping container home insulation: the best types, realistic R-values, what it costs, and how to choose the right approach for your climate and budget.
Why Insulating a Shipping Container Home Is Different
Steel is one of the worst materials you can build a home out of when it comes to thermal performance. It conducts heat roughly 300 times better than wood, meaning a bare steel container acts like a giant radiator in summer and a heat sink in winter. On a hot day, the interior of an uninsulated container can reach temperatures that are genuinely dangerous, well over 130°F (54°C) in direct sun.
But the bigger risk in most climates isn't heat, it's condensation. When warm, humid air contacts a cold steel surface, moisture forms on the walls and ceiling. In a wood-frame house, a little moisture gets absorbed by the framing and slowly evaporates. In a steel container home, that moisture sits on the metal and creates rust and mold. Without a proper shipping container home insulation strategy that addresses the dew point, you can end up with serious structural damage that's expensive and difficult to fix.
The good news: these challenges are all solvable. Builders and DIYers have been working with containers for decades, and the insulation techniques are well-established. You just need to choose the right method for your situation.
The Four Main Types of Shipping Container Home Insulation
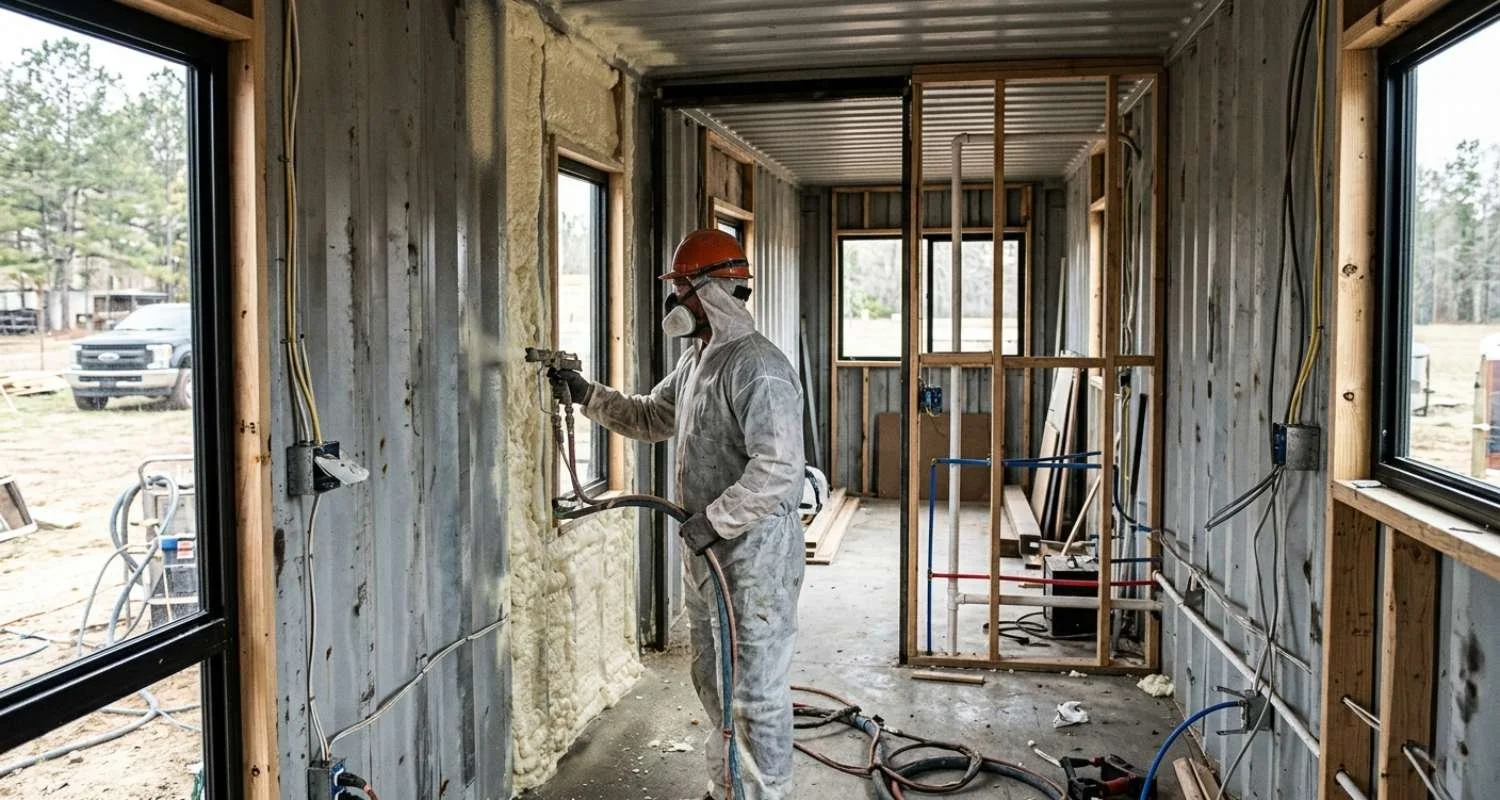
1. Spray Foam Insulation
Spray polyurethane foam (SPF) is widely considered the best choice for container homes, and it's what most professional container builders default to, especially closed-cell foam. Here's why:
Vapor barrier built in: Closed-cell spray foam is nearly impermeable to moisture. Applied directly to the interior steel walls, it eliminates the condensation problem at the source.
Excellent R-value per inch: Closed-cell foam delivers around R-6 to R-7 per inch, so you can achieve good thermal performance without giving up much interior space.
Structural benefit: Closed-cell foam actually bonds to and slightly stiffens the container walls, which can be helpful if you've made significant cuts for windows and doors.
Fills gaps and penetrations: Spray foam gets into every corner, weld, and seam and there are no thermal bridges or air gaps left unaddressed.
The main downside is cost. Closed-cell spray foam typically runs $1.50–$3.00 per board foot installed (a board foot = 1 sq ft at 1 inch thick), making it the most expensive insulation option. Open-cell foam is cheaper and has a higher R-value per dollar, but it's permeable to moisture vapor and generally not recommended as the sole insulation strategy in a container home without an additional vapor barrier.
2. Rigid Foam Board Insulation
Rigid foam panels (XPS, EPS, or polyisocyanurate) installed on the interior or exterior of the container walls are a popular DIY-friendly alternative to spray foam. They're available at any building supply store, easy to cut, and provide decent R-values:
XPS (extruded polystyrene): R-5 per inch, good moisture resistance, easy to work with — the blue or pink boards you've seen at home improvement stores.
EPS (expanded polystyrene): R-3.6 to R-4 per inch, lower cost than XPS, slightly more permeable to moisture.
Polyisocyanurate (polyiso): R-6 to R-6.5 per inch, highest performance of the three, but performance drops in cold temperatures.
The key with rigid foam in a container home is sealing all joints with spray foam or tape to prevent air and moisture from sneaking behind the panels. A fully taped and sealed rigid foam installation can be very effective, but any gaps will become condensation and mold points over time.
3. Batt Insulation (Fiberglass or Mineral Wool)
Traditional fiberglass or mineral wool batts are the cheapest insulation option, but they're the trickiest to use correctly in a container home. Because batts require a framed wall cavity, you'll need to build interior stud walls first, which takes up space and adds cost. More importantly, batts do not act as a vapor barrier on their own. In a humid climate or one with cold winters, moisture will migrate through batts and condense on the steel behind them, which is exactly what you're trying to prevent.
If you use batt insulation, you must combine it with a proper vapor barrier (typically 6-mil poly sheeting) on the warm side of the insulation, or spray a thin layer of closed-cell foam directly on the steel first as a vapor retarder before installing the batts. Many experienced container builders recommend skipping batts entirely in favor of foam for this reason.
4. Exterior Insulation
Some builders insulate the outside of the container rather than (or in addition to) the inside. The advantage is that it keeps the full interior dimensions intact and eliminates thermal bridging through the steel corrugations. The downside is that it typically requires cladding (wood siding, fiber cement, stucco) over the insulation to protect it from UV and physical damage, which adds cost and changes the look of the home.
Exterior rigid foam + cladding is a legitimate strategy, particularly for builders going for a more traditional residential appearance anyway. For those who want to preserve the industrial container look, interior insulation is the more common choice.
Understanding R-Values: How Much Insulation Do You Need?
R-value measures thermal resistance, the higher the number, the better the insulation. The right R-value depends heavily on your climate. The U.S. Department of Energy divides the country into climate zones and publishes recommended R-values for walls, roofs, and floors.
| Climate Zone | Example Locations | Recommended Wall R-Value | Recommended Roof R-Value |
|---|---|---|---|
| Zone 1–2 (Hot) | Miami, Phoenix, Honolulu | R-13 to R-15 | R-30 to R-38 |
| Zone 3 (Mixed-Hot) | Dallas, Atlanta, Los Angeles | R-13 to R-20 | R-38 |
| Zone 4 (Mixed) | Nashville, Seattle, Denver | R-20 to R-21 | R-38 to R-49 |
| Zone 5 (Cold) | Chicago, Minneapolis, Boston | R-20 to R-21 | R-49 |
| Zone 6–7 (Very Cold) | Duluth, Anchorage, Fairbanks | R-21+ | R-49 to R-60 |
For most container home builds in temperate climates, 2–3 inches of closed-cell spray foam on the walls (R-12 to R-21) combined with more substantial roof insulation hits the target. Remember: the roof takes the most sun and loses the most heat in winter, so don't skimp there.
Pro tip: The floor of a container sits on whatever foundation you're using. If the container is elevated (on piers or a raised foundation), the floor is exposed to outside air and needs insulation too, typically rigid foam sprayed or glued to the underside of the steel floor, or spray foam applied from inside before subfloor installation. Not sure which foundation is right for your build? Check out our guide to the best shipping container home foundation options.
Insulation Costs for a Shipping Container Home
Insulation costs vary significantly depending on the method you choose, the size of your build, and whether you DIY or hire a contractor. The figures below are general estimates for a single 40-foot standard container (~1,320 sq ft of wall and ceiling surface area).
| Insulation Type | Typical Cost (Installed) | R-Value Achievable | DIY Friendly? |
|---|---|---|---|
| Closed-cell spray foam (2–3 in.) | $3,500–$7,000 | R-12 to R-21 | No (requires pro equipment) |
| Open-cell spray foam (3–4 in.) | $2,000–$4,500 | R-11 to R-15 | Possible with rental kit |
| Rigid foam board (XPS, 2 in.) | $1,200–$2,500 | R-10 | Yes |
| Fiberglass batts (3.5 in. with vapor barrier) | $800–$1,800 | R-11 to R-13 | Yes |
| Mineral wool batts (3.5 in.) | $1,200–$2,500 | R-14 to R-15 | Yes |
These are rough ballpark figures and can vary significantly by region, contractor availability, and the complexity of your build (window cutouts, penetrations, and multi-container designs add cost). For a realistic budget, always get multiple bids from local insulation contractors who have experience with metal buildings or container homes specifically. For a full picture of what a container home build costs from start to finish, see our complete shipping container home cost breakdown.
Interior vs. Exterior Insulation: Which Is Right for You?
Most container homeowners insulate from the inside, and for good practical reasons. Interior insulation is cheaper to install, doesn't require cladding, and keeps the container's corrugated steel exterior visible if that's the aesthetic you're going for. The tradeoff is that it reduces your usable interior square footage, 2 inches of spray foam plus a finished wall surface can eat 3–4 inches per wall. If you're tight on space, it's worth reviewing your floor plan with insulation thickness in mind before you finalize your layout.
Exterior insulation makes more sense in a few scenarios:
You're blending containers into a more traditional-looking build and plan to add cladding anyway.
You want to maximize interior floor space (particularly relevant for smaller 20-foot containers).
You live in an extreme climate and need a very high R-value that would take up too much interior space if done from inside.
A hybrid approach, thin closed-cell foam on the interior steel for vapor control, plus thicker exterior insulation for thermal performance, gives you the best of both worlds and is used in some high-performance container home designs.
Dealing with Thermal Bridging
One challenge unique to container construction is thermal bridging through the steel corrugations and framing members. Steel conducts heat so efficiently that even if you insulate the flat surfaces well, heat can bypass the insulation entirely by traveling through exposed metal.
Practical ways to reduce thermal bridging in a shipping container home:
Use a continuous insulation layer rather than insulation only in stud cavities — continuous foam, either sprayed or in rigid board form, breaks the thermal bridge.
Use thermal breaks where steel framing members contact the interior finish — products like Roxul Safe'n'Sound or even thin strips of rigid foam between a metal stud and drywall make a real difference.
Insulate the exterior for maximum thermal bridge elimination, since the steel corrugations are covered from the outside.
Ventilation: The Often-Forgotten Partner to Good Insulation
Good shipping container home insulation creates a very tight building envelope, and that's a double-edged sword. A tight envelope is energy-efficient, but it also means that moisture from cooking, showers, breathing, and daily life has nowhere to escape. Without adequate ventilation, you'll get condensation on windows, mold in corners, and poor indoor air quality even in a well-insulated home.
The building science principle to follow: "Build tight, ventilate right." Most container home builds in climates with cold winters or high humidity benefit from a Heat Recovery Ventilator (HRV) or Energy Recovery Ventilator (ERV), a mechanical ventilation system that exchanges stale indoor air for fresh outdoor air while recovering most of the heat (or cooling) in the process. These systems cost $800–$2,000 installed and make a significant difference in both comfort and air quality. The EPA's indoor air quality guidelines are a helpful reference for understanding minimum ventilation requirements in a tight home.
At a minimum, ensure your kitchen and bathroom have exhaust fans vented to the exterior, and that your HVAC system includes some fresh air intake. Don't seal your container home so tight that you trap moisture inside.
Choosing the Right Insulation for Your Climate
Climate should drive your insulation strategy more than anything else. Here's a quick framework:
Hot, dry climates (Phoenix, Las Vegas): Focus on keeping heat out. Radiant barriers under the roof, reflective exterior coatings on the container walls, and R-15 to R-20 roof insulation are priorities. Condensation is less of a concern, so open-cell foam or rigid boards work well.
Hot, humid climates (Houston, Miami, New Orleans): Condensation control is critical. Closed-cell spray foam is the preferred choice because it acts as a vapor barrier. A dehumidifier or ERV is highly recommended.
Cold climates (Chicago, Minneapolis, Denver): Maximize R-value, especially in the roof and floor. Closed-cell foam or a well-sealed rigid foam system with a vapor barrier on the warm side. Thermal bridging becomes a bigger issue, so consider exterior insulation or a hybrid approach.
Mixed climates (Seattle, Nashville, Atlanta): A balanced approach, closed-cell foam or rigid foam with sealed joints, plus an HRV for ventilation. R-15 to R-20 walls, R-38+ roof.
Shipping Container Home Insulation: Step-by-Step Overview
Whether you're hiring contractors or doing it yourself, here's the general sequence for insulating a container home. If you're earlier in your planning process, our start-to-finish guide to building a container home covers how insulation fits into the broader build timeline.
Prep the steel: Remove any remaining wooden flooring if it has been treated with pesticides (common in older containers). Clean the interior walls of rust, dirt, and residue. Apply a rust-inhibiting primer if needed.
Seal penetrations: Before insulating, make sure all electrical conduit, plumbing, and HVAC penetrations through the container walls are roughed in and any gaps are pre-sealed.
Apply vapor control layer: For closed-cell spray foam, this is the foam itself. For other methods, apply 6-mil poly or a spray-applied vapor retarder directly to the steel.
Install primary insulation: Apply spray foam, rigid boards, or batts to achieve your target R-value. For roofs and floors, err on the side of more insulation.
Frame interior walls: Build non-structural interior stud walls inside the insulation layer for running wiring and attaching drywall or other finish materials.
Install finish surfaces: Drywall, plywood, or other interior cladding. Tape, mud, and finish as in conventional construction.
Install ventilation: HRV/ERV, exhaust fans, and HVAC before closing up any remaining openings.
Common Mistakes to Avoid
After years of container home builds, a few mistakes come up again and again:
Skipping vapor control: The most common and most damaging mistake. Even in dry climates, uncontrolled moisture will eventually cause problems.
Using open-cell foam without a vapor barrier: Open-cell foam allows moisture to pass through. In humid or cold climates, this means moisture reaches the steel and condenses.
Under-insulating the roof: The roof experiences the most extreme temperature swings and solar gain. It should always have more R-value than the walls.
Forgetting the floor: Especially if the container is elevated, an uninsulated steel floor will be cold in winter and cause condensation issues.
Not planning for ventilation: Tight insulation without mechanical ventilation leads to poor air quality and moisture buildup.
Final Thoughts
Shipping container home insulation isn't glamorous, but it's foundational. The difference between a container home that's a joy to live in and one that's plagued by moisture, mold, and uncomfortable temperatures almost always comes down to whether the insulation was done thoughtfully. Closed-cell spray foam remains the gold standard for good reason, it handles both thermal performance and vapor control in a single step. But rigid foam boards, when properly sealed, offer a cost-effective alternative for budget-conscious builders.
Whatever approach you choose, the key principles are the same: control moisture first, hit your climate's recommended R-values, don't forget the roof and floor, and pair your insulation with proper mechanical ventilation. Do those things, and your shipping container home will be comfortable, efficient, and built to last for decades.
Ready to start planning your container home build? Insulation decisions are closely tied to your foundation type, climate zone, and floor plan, so it pays to think about all three together before you break ground. And if you're still weighing whether a container home is right for you, our overview of the key benefits of container home living is a great place to start.